Call us on 2514578498
Call us on 2514578498

Photography handout
Before you get to take the photo …
1 Check the quilt
Make sure all loose threads and pet hair are removed. The camera will see them even if you don’t!
2 Hanging the quilt
The first thing you will need to work out is how you are going to hang or pin your quilt so that it is flat and square.
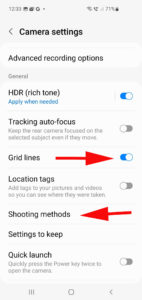
3 Checking your phone camera settings
Go to the gear wheel, which shows you settings. Make sure that you have grid lines set to On. This gives you some guidelines to help you make sure your camera is square on to the quilt.
4 Lighting the quilt
The best light is daylight but not direct sun. Daylight gives truer colours than artificial light, but sun causes shadows. To show up the dimensionality of the quilting you need light at a 90 degree side angle, so you might need some supplementary lighting either for the side lighting or for making any shadows less visible. Daylight bulbs are the best option for artificial light. Switch off your downlighters and any other lighting that distracts or casts shadows.
5 Taking the photo
Switch off your flash. Using the gridlines as a guide, get your quilt into the frame, showing all edges of the quilt. For larger quilts you have to stand further away to get them all in. Hold the camera at approximately the centre height and width of the quilt for the least distortion. Take a couple of shots and then check out if they are showing the quilt with good lighting and in focus.
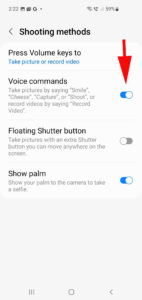
It is much easier to hold the camera still if you use voice activation for your command, rather than pressing the button.
Android
Iphone
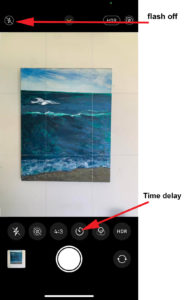
Another method is to use the 3 second delay option.
Yet another method is to use a tripod or gorilla stand.
6 Editing the photo
You have various options for editing: cropping and straightening, exposure correction, filters and adding text.
The ones you are most likely to use are cropping and straightening, when you have a lot of background that you need to remove. Also temperature, under the light balance icon, if your photo is bluer than the real thing, for example under artificial art. You can add a little bit of warmth to correct that.
7 Resizing your photo
First, you will want to know how many MB your photo is.
Android
In the main photo menu at the bottom right there are 3 dots. One of those options is Details, which will tell you how many MB your photo is. It will also tell you the dimensions in pixels. Some show entries want you to have photos between 2 and 4 MB. Others will tell you that you must have more than 2000 pixels on the longest side. You can see that you could choose any of the 3 lower options and still have more than 2000 pixels on the longest side.
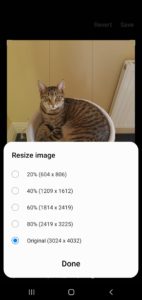
To resize your photo, go to the edit menu (looks like a pencil) and then the 3 dots on the right offer you a resize option. You would only need to resize if the MB were too large for your submission. They vary, 4 MB is probably OK but 11 MB would be too large. Each show will give you guidelines.
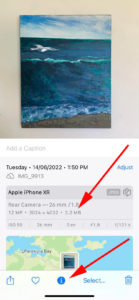
Iphone
The details of size are visible from the ‘i’ symbol at the bottom of the screen
8 Naming your quilt photos
Every show will have its own requirement for naming your quilts, usually to avoid having your name visible. It is a little bit more complicated to rename your photos in your phone, so it is really easier to do it in your computer. You can transfer the photos from your camera by downloading from the camera card, emailing them to yourself, or using Bluetooth. Another option for Iphone users is to use an app called Simple Transfer.
Once you have your photos edited to your liking, you can rename them by right clicking on the photo thumbnail or in the list by name, and near the bottom is the option to rename.
9 Summary
Taking quilt photos for show entries is not a 5 minute job. You need to prepare your quilt, the location and lighting, take lots of shots to determine what needs to be changed to make the best possible image. Once you have determined a good place in your house or other location that has the appropriate space and lighting, you can go back to that for future photos. Good luck.
10 Other photo opportunities
There might be times you want a different kind of photo, on a bed, artfully draped somewhere etc. Most of the features we have talked about here still apply, apart from pinning square. Even if you are doing a more natural type of shot, it is worth experimenting with the lighting, doing some ‘gardening’, i.e. removing anything from the photo that is distracting, and preferable placing some toning items, or something like a spray of flowers, to enhance the image. Play around and always be guided by what the camera sees and not what you see,
2026 © Aotearoa Quilters. All rights reserved.